
Raising chicks at home can be such a rewarding experience, but you’ve got to give those little fluff balls a safe, warm space to start out. That’s where your brooder box comes in. It’s basically the first home your chicks will know, so it matters way more than people think. From my own personal experience, a good DIY brooder setup can make raising chicks smoother, easier, and way more enjoyable.
Now, there’s no one-size-fits-all when it comes to brooder boxes. You’ve got to think about the number of chicks, the space you have, and how much effort you want to put into it. What ever you need, even if you’re trying to reuse things you already have or you’re open to building something from scratch, there’s a DIY option for you. Let me show you super doable and creative brooder box ideas that can help you raise healthy chicks from day one.
1. Plastic Storage Bin Brooder
This one is a total favorite for beginners and anyone who wants a fast, no-fuss option. You probably already have a big plastic storage bin lying around, and if not, they’re cheap and easy to find at any store.
Why It Works So Well
The smooth plastic walls are easy to clean and don’t soak up moisture. That means fewer bacteria and no stink. Plus, plastic bins hold heat better than something like cardboard. You can pop a heat lamp or a brooder plate right over the top, and it’ll stay nice and toasty.
How To Set It Up
You want a bin that’s at least 12 to 18 inches tall so the chicks don’t fly out once they start growing feathers. Cut out a section of the lid or the top edge and replace it with mesh or hardware cloth so there’s airflow, but the chicks stay safe inside. Add pine shavings on the bottom for bedding, drop in a small feeder and waterer, and you’re basically done.
Pro Tips
Make sure the bin is clear or semi-transparent if you want to keep an eye on them easily. If you’re using a heat lamp, clip it above the mesh area, not directly on the plastic, it can melt. And check the temp regularly to keep it consistent.
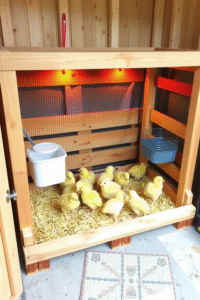
2. Wood Pallet Brooder Box

If you’ve got some old wood lying around or access to pallets, this one’s perfect for you. It’s more of a permanent option, and you can size it up for larger flocks.
Building Basics
You don’t need fancy tools for this, but you do need a saw, drill, and some screws. Break down a few pallets and create a rectangular frame, basically a low wooden crate. You can line the inside with cardboard or smooth plywood to keep things cozy and easy to clean. Add short legs if you want to keep it off the ground.
Add A Lid Or Cover
Use hardware cloth and staple it to a wooden frame to create a lid. This keeps predators out if you’re keeping the brooder in a garage or shed, and it stops chicks from trying to escape once they start flapping around.
From My Own Personal Experience
This is the design I used when I raised a batch of 15 chicks, and it gave me enough space to keep things organized. I even added a little perch using a broomstick across one corner. It was fun watching them learn to jump and balance. The wood also made it super easy to attach things like a thermometer and heat lamp safely.
Cleanup Tip
Put a tarp underneath the whole box if it’s indoors. Wood can be messy with bedding spilling over, and the tarp makes cleanup a lot easier. Scoop the shavings every couple of days and replace with fresh ones to keep things clean.
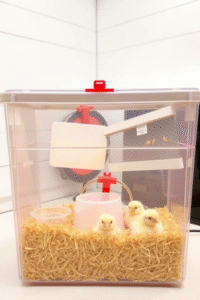
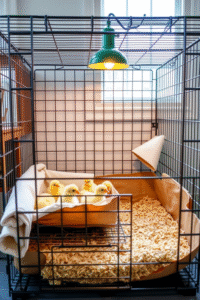
3. Large Dog Crate or Rabbit Cage Brooder
This one’s kind of a hack but works surprisingly well. If you’ve got a large dog crate or even a rabbit cage, you’ve already got the frame of a great brooder.
What Makes It Work
These crates are already built to be secure and breathable. The metal bars mean there’s already good airflow. All you really need is to line the bottom with something waterproof and add bedding. Some people use puppy pads underneath shavings for extra protection.
Heat and Light Setup
Because of the wire top, clipping a heat lamp is easy and safe. You can adjust the height without having to build anything extra. Just make sure the heat reaches the bedding area and doesn’t create drafts.
Covering Sides
You may want to cover the lower part of the crate with cardboard or an old towel so chicks don’t get cold from too much air movement. It also helps them feel a little more secure, like they’re not totally exposed.
Why This Is a Solid Option
If you’re short on time or tools, this is a great way to set up a temporary brooder quickly. You can disassemble it, clean it, and store it without taking up much space later. And you won’t need to build anything if DIY isn’t really your thing.
What Every Brooder Box Needs
No matter which design you go with, there are a few things every brooder needs to be safe and comfy for chicks.
Temperature Control
Chicks need to stay warm, around 95°F for the first week, then you drop it 5°F each week as they grow. Use a brooder thermometer to track it. Whether you use a heat lamp or a brooder plate, always double-check that chicks aren’t too cold or too hot. If they huddle together under the heat, it’s too cold. If they’re spread out away from it, it’s too hot.
Bedding
Stick to pine shavings. Don’t use cedar, it can be harmful. Shavings are soft, absorb moisture, and give chicks traction. Avoid newspaper, it’s too slippery and can cause leg problems.
Food and Water
Keep the feeder and waterer low enough for chicks to reach but raised just a little above the bedding so they don’t fill it with shavings. Clean and refill daily. Chicks love making a mess, so don’t be surprised if you find pine shavings everywhere.
Safety
No sharp edges, loose wires, or places where tiny toes can get caught. Double-check all corners and edges before putting chicks inside.
Keeping Your Brooder Clean
This part is key. A dirty brooder can cause health problems fast. Scoop out soiled bedding every day or two, and change everything out once a week. Clean waterers with warm soapy water, and wipe down any surfaces with a mild vinegar solution if needed.
If your brooder is in a garage or basement, make sure you’re not attracting mice or bugs with spilled food. Keep the area around the brooder tidy too.
Creative Touches You Can Add
If you’re into making things cute or just want a more organized space, here are a few fun upgrades:
Chick Playground
Add a small perch, cardboard tunnel, or wooden block to climb. Chicks are curious and love little obstacles.
Viewing Window
If you’re using wood or cardboard for walls, cut out a small section and tape clear plastic over it. Now you can peek in without lifting the lid.
Color and Decor
Paint the outside of your wooden brooder (with safe, non-toxic paint) or add some farm-themed stickers. It doesn’t change function, but it can make the setup more fun, especially if kids are involved.
4. Cardboard Box Brooder
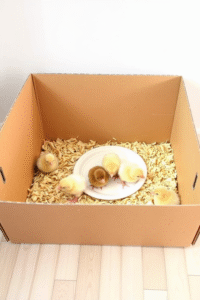
This is probably the simplest brooder idea out there, and it’s perfect if you’re only raising a few chicks for a short period. You probably already have a cardboard box sitting around, which makes it super convenient.
Why It’s So Handy
Cardboard is easy to set up, lightweight, and disposable. You don’t need tools or much time. Just open the flaps, line the bottom with pine shavings, and you’re ready to go. If the box is deep enough, it keeps chicks from jumping out, especially in the first couple of weeks.
What To Watch Out For
Cardboard absorbs moisture, so it gets soggy fast if you’re not changing out bedding regularly. It’s also flammable, so be super careful with heat lamps. Use a brooder plate if possible, or clip the heat lamp in a way where it never touches the box. Keep an eye on the temperature inside too—cardboard doesn’t hold heat as well as plastic or wood.
Quick Fix
Place the cardboard box inside a plastic tray or low bin to catch any spills. When it’s time to clean or move the chicks to a bigger space, you can toss the whole thing and start fresh.
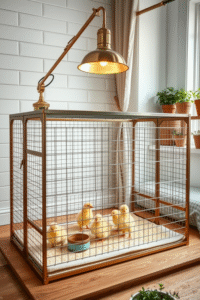
5. The Wire Frame Brooder Box
A space-saving, ventilated option for your chicks. If you’re looking for a simple yet effective brooder design, a wire frame brooder box might be the perfect solution. This design is ideal if you’re trying to save space and still provide plenty of ventilation for your chicks. It’s lightweight, easy to set up, and allows you to monitor the chicks from all angles.
How to make it
To build a wire frame brooder, start with a wire frame or a metal grid, which you can often find at hardware stores. Cut it into panels and assemble them to form a box shape. The frame can either be free-standing or placed inside a larger container for added stability. You’ll need to cover the sides with chicken wire or mesh to prevent escapes, and you can line the bottom with bedding to absorb waste.
For heating, you can use a heat lamp or heat plate above the box. Make sure to hang the heat source safely so it doesn’t come into contact with the wire frame. This type of brooder is very open and airy, allowing for excellent ventilation, which is great for the chicks’ health.
Why this design is effective
The wire frame brooder box is lightweight and allows for excellent airflow. It’s also easy to clean, as you can shake out the bedding and wash down the frame with a hose. The open design allows you to observe your chicks from all angles, making it perfect for those who enjoy keeping a close eye on their flock.
From my own personal experience
I’ve used a wire frame brooder for one of my broods, and I loved how easy it was to clean. The ventilation was great, and the chicks seemed to enjoy the extra space. The only downside was that it wasn’t as insulated as some of the other options, so I had to make sure the temperature stayed consistent.
6. PVC Pipe Brooder Box
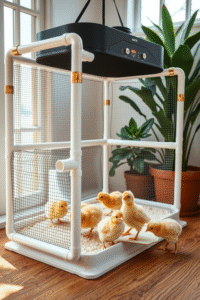
A customizable and durable brooder solution. If you’re up for a little more of a DIY project and want a durable, long-lasting brooder, a PVC pipe brooder box might be the way to go. This design is completely customizable, allowing you to create the perfect size for your chicks. It’s strong, easy to clean, and can be disassembled for storage.
How to make it
For a PVC pipe brooder box, you’ll need PVC pipes (at least ¾-inch diameter), connectors, and some mesh or chicken wire. Start by creating a frame with the PVC pipes, making sure the dimensions are large enough to comfortably house your chicks. You can use T-joints and elbow connectors to assemble the frame and make it sturdy. Once the frame is in place, cover it with mesh or wire to keep the chicks inside and allow for airflow.
The bottom should be lined with bedding material, and a heat lamp or heat plate can be suspended from the top. This setup is highly customizable, if you want to create different sections for the chicks to explore, you can easily add dividers or adjust the size of the box.
Why this is a great option
A PVC pipe brooder box is incredibly durable and long-lasting. It’s also completely customizable, so you can build it to fit your specific needs. If you need to expand or adjust the space as your chicks grow, it’s easy to make modifications. The design is lightweight and portable, making it easy to move around when necessary.
From my own personal experience
I built a PVC pipe brooder for my chicks last year, and it’s one of the best investments I’ve made. It’s solid, easy to clean, and has lasted through multiple broods. I can also adjust the size whenever I need to, which is perfect as the chicks grow.
7. The Chicken Tractor Brooder Box

A mobile brooder box that gets your chicks outdoors. For those looking for something more mobile, a chicken tractor brooder box could be the perfect solution. A chicken tractor is essentially a portable coop, and when designed as a brooder, it can be moved around your yard to give the chicks fresh grass and sunlight. This setup works best if you have a large yard or garden area.
How to design it
Start by building a small, lightweight frame using PVC pipes or wood. The idea is to create a box on wheels so you can roll it around easily. The bottom should be covered with a wire mesh floor to prevent chicks from digging up the grass. Inside, provide bedding and a heat source.
For added convenience, include a removable roof or mesh sides to ensure ventilation. The tractor can be moved to a different spot each day, allowing the chicks to enjoy fresh greenery and sunlight. Just be sure to keep a heat lamp nearby for those cooler nights.
Why people love this design
A chicken tractor provides a great balance of mobility, space, and fresh air for your chicks. It’s perfect if you want them to start acclimating to outdoor conditions but still need to protect them from predators and weather. The ability to move it around makes this one of the most versatile brooder boxes on the list.
From my own personal experience
I tried a chicken tractor with my third batch of chicks, and they loved it. I set it up in my garden, and they got to explore new patches of grass every day. The only challenge was making sure the tractor didn’t get too hot during sunny afternoons, but with a few adjustments, it became a game-changer for me.
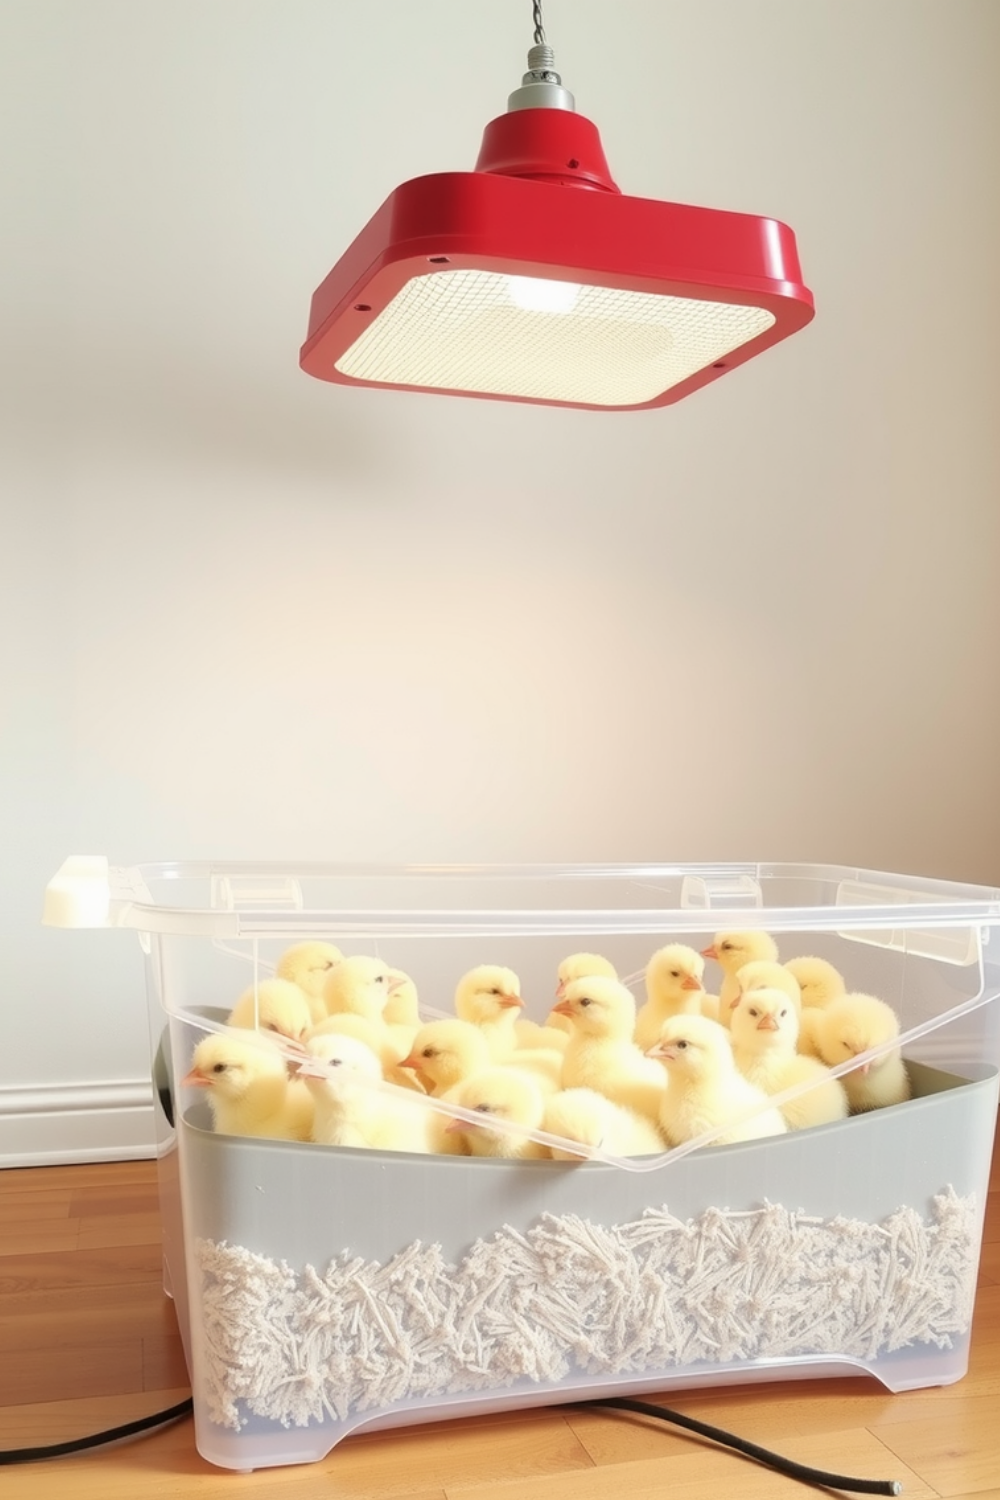
8. Plastic Tote Brooder

This one’s a favorite for a reason. A large plastic storage tote is sturdy, easy to clean, and totally reusable. You’ll find them at any home goods store, or you might already have one sitting in a closet or garage.
Setup Is Super Simple
Pick a tote with high sides so the chicks can’t jump out. Cut out a large section of the lid and replace it with hardware cloth or mesh. This gives the chicks air while keeping them safe inside. You can secure the mesh with zip ties, duct tape, or screws and washers if you’re feeling fancy.
Light and Heat
Because plastic can melt, avoid attaching heat lamps directly to the sides or lid. Instead, clip the heat lamp to a stand or hang it above the tote. You can also place a brooder plate inside to keep things safer and more stable.
Cleaning Is a Breeze
Plastic totes are water-resistant and smooth, so you just dump the bedding, spray it down with vinegar or a mild cleaner, wipe it out, and you’re good to go again. If you’re raising chicks in batches, this setup will last through many broods.
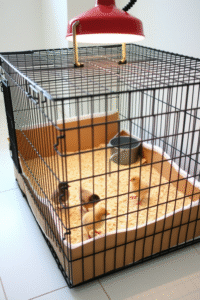
9. Large Dog Crate Brooder
If you’ve got an old dog crate, that wire frame makes for a great starter brooder. It already has high sides, a locking door, and space to hang a heat lamp or brooder plate safely.
Making It Chick-Friendly
Line the bottom with a waterproof tray or puppy pad, then add a thick layer of pine shavings. Wrap the lower part of the crate with cardboard or an old towel to block drafts and stop bedding from flying out.
Perfect for Ventilation
The open wire frame gives solid airflow, which is important for keeping humidity down. You’ll just want to make sure the room it’s in stays warm enough so chicks don’t get chilled.
Extra Tip
As chicks grow, they’ll start jumping and flapping. You can lay a piece of mesh or fabric over the top to keep them from flying out. Plus, the crate door makes feeding and cleaning super easy without lifting a whole lid off.
10. Pallet Wood Brooder
Got access to free pallets? You can build a custom-sized brooder box using reclaimed wood. It’s a bit more work, but it’s great for people who want a more permanent setup.
From My Own Personal Experience
I once built a pallet brooder in my shed, and it felt like a mini chick mansion. I cut down the pallet slats, built a square frame, and lined the inside with a tarp. Then I stapled chicken wire across the top and added a hinged lid for easy access. It held up all season, and I used it again the next spring.
Building It Right
Make sure the wood is clean and hasn’t been treated with anything toxic. Nail or screw the sides together securely. If you’re worried about drafts, line the inside with cardboard or thick plastic sheeting. Add wheels if you want to move it around.
Long-Term Perks
It’s sturdy, can hold a large number of chicks, and it’s easy to customize. You can add little roosts, feeding stations, and more. Great option if you’re planning to raise chicks year after year.
11. Clear Bin Shelf Brooder
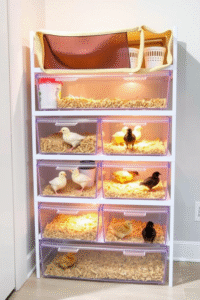
This one is a fun idea if you like being organized. Use those stackable clear plastic drawers or bins, like the kind people use for shoes or craft storage, and turn them into multi-level chick habitats.
How to Build It Out
Remove the drawers and use the empty frame as your base. Stack two or more plastic bins into the openings, and leave one or two open for better airflow. Line each bin with bedding, and keep food and water in the lowest level. Use the upper ones as play areas or sleeping zones. You can even cut openings between bins and connect them with tubes or ramps if you want to get fancy.
Easy to Monitor
Because the bins are clear, you can see how clean they are and check on the chicks without opening the whole setup. Add mesh or breathable fabric to the tops of each level to keep it safe and airy.
Super Handy Indoors
This setup works best in a warm indoor space where you’ve got more control over the temperature. Great for people in small homes or apartments who still want to raise a few chicks at a time.
12. Kiddie Pool Brooder
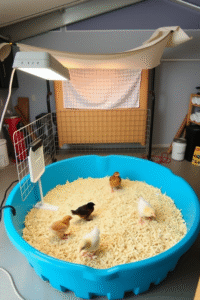
Yep, those plastic kiddie pools from the dollar store or hardware shop can double as a spacious, lightweight brooder.
Setup Without the Fuss
Just grab a cheap kiddie pool, place it on a clean, flat surface, and fill it with a few inches of pine shavings. To keep the chicks contained, wrap the outside in cardboard or hardware cloth about two feet high. You can tape or zip-tie it into a ring around the pool.
Why It Works
It gives your chicks plenty of room to move around and grow without needing fancy construction. Plus, you can see them from above easily and reach in without much effort. If you need to block drafts or heat, just toss a fitted sheet or mesh over the top.
A Few Extra Tips
Keep this one indoors or inside a draft-free garage. And don’t forget to raise the heat lamp high enough to avoid melting the plastic. From my own personal experience, this setup worked great during a spring hatch, I had room for waterers, feeders, and a brooder plate with no overcrowding.
13. Cardboard Box Brooder
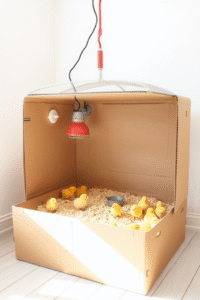
If you’re starting small and want something fast and nearly free, go with a good old cardboard box. It’s easy to set up, surprisingly effective, and ideal for short-term use.
Keep It Simple
Pick a large, sturdy box like the kind you’d get from a moving company or appliance store. Line the bottom with several layers of paper and then pine shavings. Cut out windows on the sides if you want more airflow, and tape mesh or breathable fabric over the openings.
Make It Last
Cardboard isn’t waterproof, so you’ll need to change bedding often. You can also place a tarp or trash bag underneath to catch any spills or leaks. And once the chicks outgrow it or the box starts to break down, you can replace it or recycle it.
Why You’ll Like It
Perfect for a one-time batch of chicks. It’s lightweight, flexible, and doesn’t need tools or supplies to build. Great for teaching kids about raising chicks without too much commitment.
14. Old Drawer Brooder
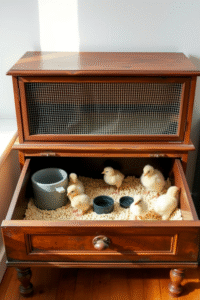
Have a broken dresser or an extra drawer lying around? You can turn it into a quirky and cute brooder with just a few tweaks.
Flip It Into Something Useful
Pull out the drawer, line the inside with a plastic bag or tarp, then add bedding. Use scrap wood or wire mesh to build up the sides if it’s shallow. Set it on a table or crate so it’s off the ground, then clip a heat lamp above or use a brooder plate inside.
It’s Great for Smaller Spaces
This is a good option if you’re hatching just a few chicks and want something that doesn’t take up much room. You can even decorate the outside if you’re feeling crafty. Add wheels to the bottom or handles to the sides if you plan to move it around.
One Cool Bonus
Drawers usually have smooth insides, so they’re easy to wipe clean. And you’re upcycling something instead of tossing it, always a win.
15. Bookshelf Brooder

Got an old bookshelf? You can lay it on its back and use the shelving sections as separate brooder zones.
Divide and Raise
Turn the shelf flat so the compartments face upward. Line each one with bedding, and cover the top with mesh or breathable cloth. If you’re raising different breeds or need to isolate weaker chicks, this lets you give them space without needing multiple boxes.
Great for Customizing
You can block off certain sections, cut in ramps, or even remove shelves to make a larger space. Set a heat source over the top and move it between sections depending on where chicks are resting.
A Fun Way to Reuse
It turns unused furniture into a chick-raising station. This is a fun one if you’ve got older kids helping with the process too, they love setting up the “rooms” for each group of chicks.
How To Pick The Right Brooder For You
Don’t overthink it. Think about how many chicks you’re raising, where you’ll keep the brooder, and how much time or money you want to put into it.
If you just need something fast and cheap, go for the plastic bin. If you want something larger or more permanent, wood pallets are perfect. If you’re working with what you have, repurpose that dog crate or rabbit cage.
It’s all about what fits your space and makes sense for your flock. You can always tweak it as you go. And the cool part is, once you’ve done it once, you’ll know exactly what to change next time.
Wrapping Up
Trying out different brooder setups has helped me figure out what really works for each season and space. Sometimes you only need a quick fix like a cardboard box. Other times, it makes more sense to build something lasting like a pallet brooder or an upcycled drawer.
Whatever you’ve got lying around, whether it’s a pool, crate, bin, or bookshelf, there’s probably a way to turn it into a brooder. It just takes a little imagination, basic supplies, and a warm corner.
Got a weird or clever setup you’ve tried that worked surprisingly well? Share it below, I’d love to hear what you’ve used, and I bet other folks would too. Let’s keep the ideas flowing.

I’m Gemma, a passionate lifestyle blogger sharing my creative world with you. Gemitaliano.com is my little corner of the internet, glad you’re here.